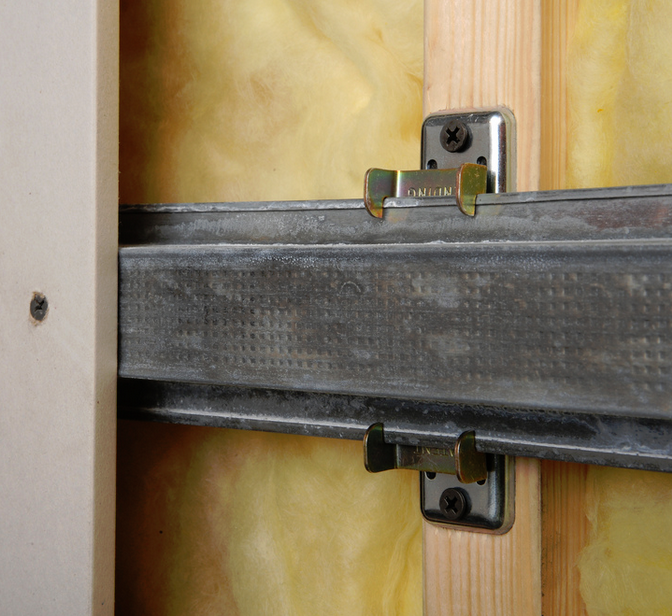
Green Glue Whisper Clips are installed in walls and ceilings to mechanically separate the two sides of the structure which helps eliminate the transmission of sound from one side to the other. The key is to properly install the clips and hat channel to ensure the best results.
The first thing to note is that when using clips and hat channel to decouple a wall or ceiling, the clips must be installed directly to the wall stud and/or ceiling joists. The clips should NEVER be installed over a layer of drywall to avoid the "triple leaf" effect.
Installation Instructions:
STEP 1: Mark out on the studs or joists the locations of where the clips will be installed with a marker.
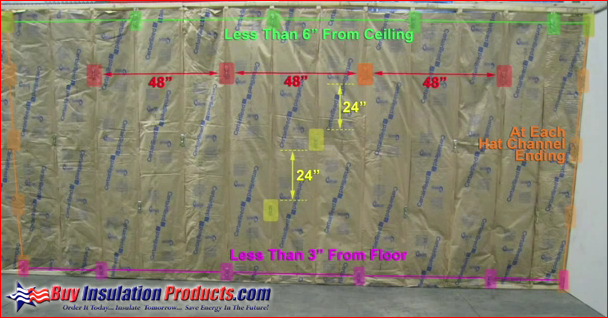
Green Glue Noiseproofing Clip Layout
(1) Clips are spaced no further than 48 inches apart horizontally
(2) Hat channel must not be spaced more than 24 inches vertically
(3) Bottom clips must be less than 3 inches from the floor
(4) Top clips must be less than 6 inches from the ceiling*
* For ceiling installation, the same pattern is used. However the 3” minimum spacing should be used at the drywall edges to ensure proper support for the sheet, not 6” as used for walls.
***Clips must be placed at the outermost studs on every piece of hat channel
Green Glue Whisper Clip Layout Guide
STEP 2: Fasten the Green Glue Whisper Clips onto the Studs and/or Joists.
Fastener Requirements:
Wood Studs / Joists: Use #8 x 2-2/12” Coarse thread screws
Steel Studs / Joists: Use #8, 10 or 12 x 1-5/8” Type S self tapping screws
Concrete: Use 3/16” diameter x 2-1/4” long Tapcon anchor screws
STEP 3: Snap the hat channel into the clips
Hat Channel Requirements:
We have a great blog post about the correct type and dimension of hat channel to use with Green Glue Whisper Clips
Click here to See the Hat Channel Blog Post
How to Handle Hat Channel Overlaps:
Overlaps of pieces of hat channel is going to be unavoidable in most walls and ceilings. Overlap 6 inches of hat channel between two clips. Secure the hat channel with two 7/16” framing screws. 18 gauge tie-wire can also be used.
STEP 4: Install the Drywall onto the Hat Channel
Place shims on the floor to allow spacing between the drywall and the flooring. This ensures decoupling from the floor to make it impossible for vibrations to travel from wall to floor and vice-verse. Screw drywall in place through hat channel. Be sure drywall is fully installed before removing shims from underneath.
**IMPORTANT: Make sure to only screw into the hat channel and avoid accidentally screwing into a stud or clip which is referred to as "short circuiting" a whisper clip.
STEP 5: (Optional But Highly Recommended) Install a Second Layer of Drywall with Green Glue Noiseproofing Compound
Rather than elaborate on the benefits of adding Noiseproofing Compound in this post, click here to go to another blog post on this product
STEP 6: Seal all air gaps and perimeter of the wall and/or ceiling
Be sure to use an acoustical sealant to fill gaps around electrical boxes, windows, doors, and areas below or above sheets of drywall. Green Glue Noiseproofing Sealant is perfect for this application as it allows flexibility while stopping sound from transmitting through unsealed areas.